Table of Contents
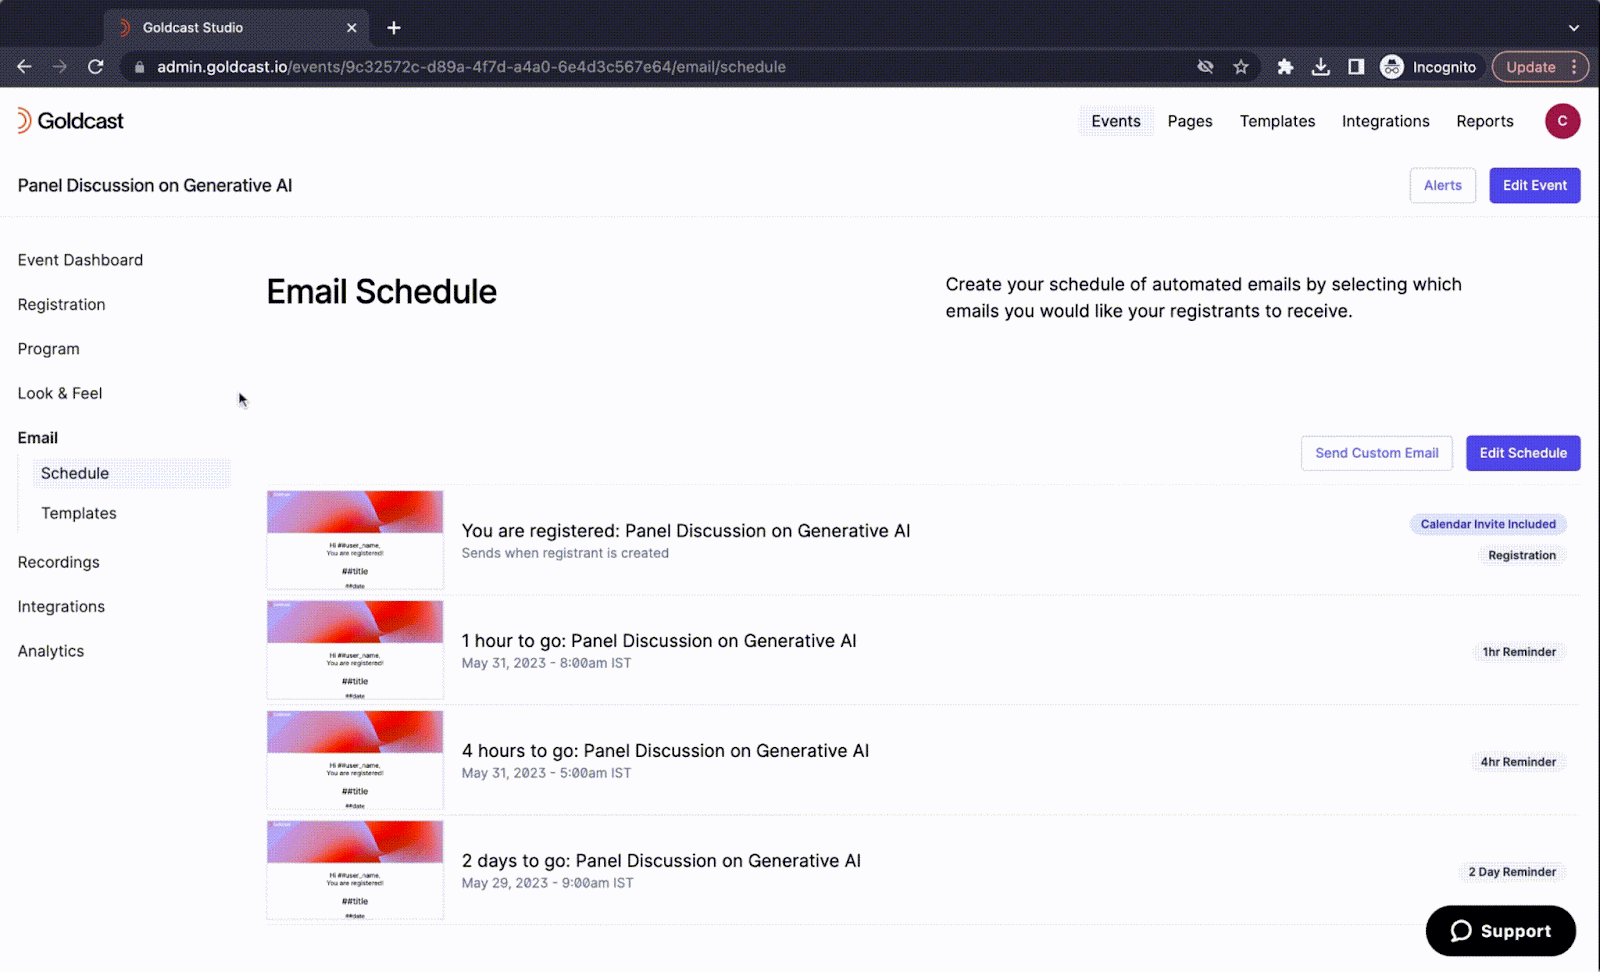
The Email Schedule page appears. This page displays the list of active emails in chronological order.
Pro Tip: We recommend setting up the email templates and schedule prior to starting event registrations. This approach ensures that all communications sent through Goldcast reflect your preferred branding and style, while also providing attendees with consistent messaging.
Types of emails in Goldcast
In Goldcast Studio, you can create and schedule event-specific emails using templates. There are two main types of emails:
Standard
These are pre-defined messages that you can send at specific times. They include registration confirmation, reminders, attendee follow-up emails, and non-attendee follow-up emails. This table lists the standard emails you can send to registrants:
| Email Type | Recipient | Description |
|---|---|---|
| Registration confirmation | Registrants |
This email is triggered whenever an attendee registers for the event via the registration page.
|
| Calendar invite email | Registrants | Includes the .ics calendar invite to your event. Sent along with the registration email. |
| 1 Week Reminder* | Registrants | Sent one week before the event. |
| 2 Day Reminder* | Registrants | Sent two days before the event. |
| 1 Day Reminder* | Registrants | Sent one day before the event. |
| 4 Hour Reminder* | Registrants | Sent four hours before the event’s start time. |
| 1 Hour Reminder* | Registrants | Sent one hour before the event’s start time. |
| 5 Minute Reminder* | Registrants | Sent five minutes before the event’s start time. |
| 1 Day post-event: Attendee follow-up email* | Attendees | Sent 24 hours after the event. Only to registrants who attended the event. |
| 1 Day post-event: Non-attendee follow-up email* | Non-attendees | Sent 24 hours after the event has ended, only to registrants who missed the event in real-time. |
| Speaker Emails | ||
| Speaker Instructions Email | Speakers | Sent when speaker is added to event. Includes calendar invite and instructions. |
| Speaker 1hr Reminder | Speakers | Sent one hour before the event’s start time. |
| Speaker 1Day Reminder | Speakers | Sent one day before the event. |
| Staff Emails | ||
| Staff Instructions Email | Staff | Sent when staff member is assigned. Includes calendar invite and instructions. |
| Staff 1hr Reminder | Staff | Sent one hour before the event’s start time. |
| Staff 1Day Reminder | Staff | Sent one day before the event. |
 Note: It is also sent when you add registrants manually.
 Reminder emails are time-based and triggered relative to the event's start time. You can customize their timing and reschedule them as needed.
Custom
Custom emails are scheduled communications that operate outside predefined emails. They give you full control to send immediate, situation-specific updates to registrants, such as last-minute agenda changes, speaker announcements, or urgent event modifications, whenever needed.
Note: Banned registrants do not receive any further emails from Goldcast.
Email Limits
- You can schedule up to 10 custom emails per event.
- You can schedule up to 10 custom emails per template.
Manage email templates
Each email you schedule will have an assigned email template. Follow these steps to create, manage, and edit email templates:
For Events
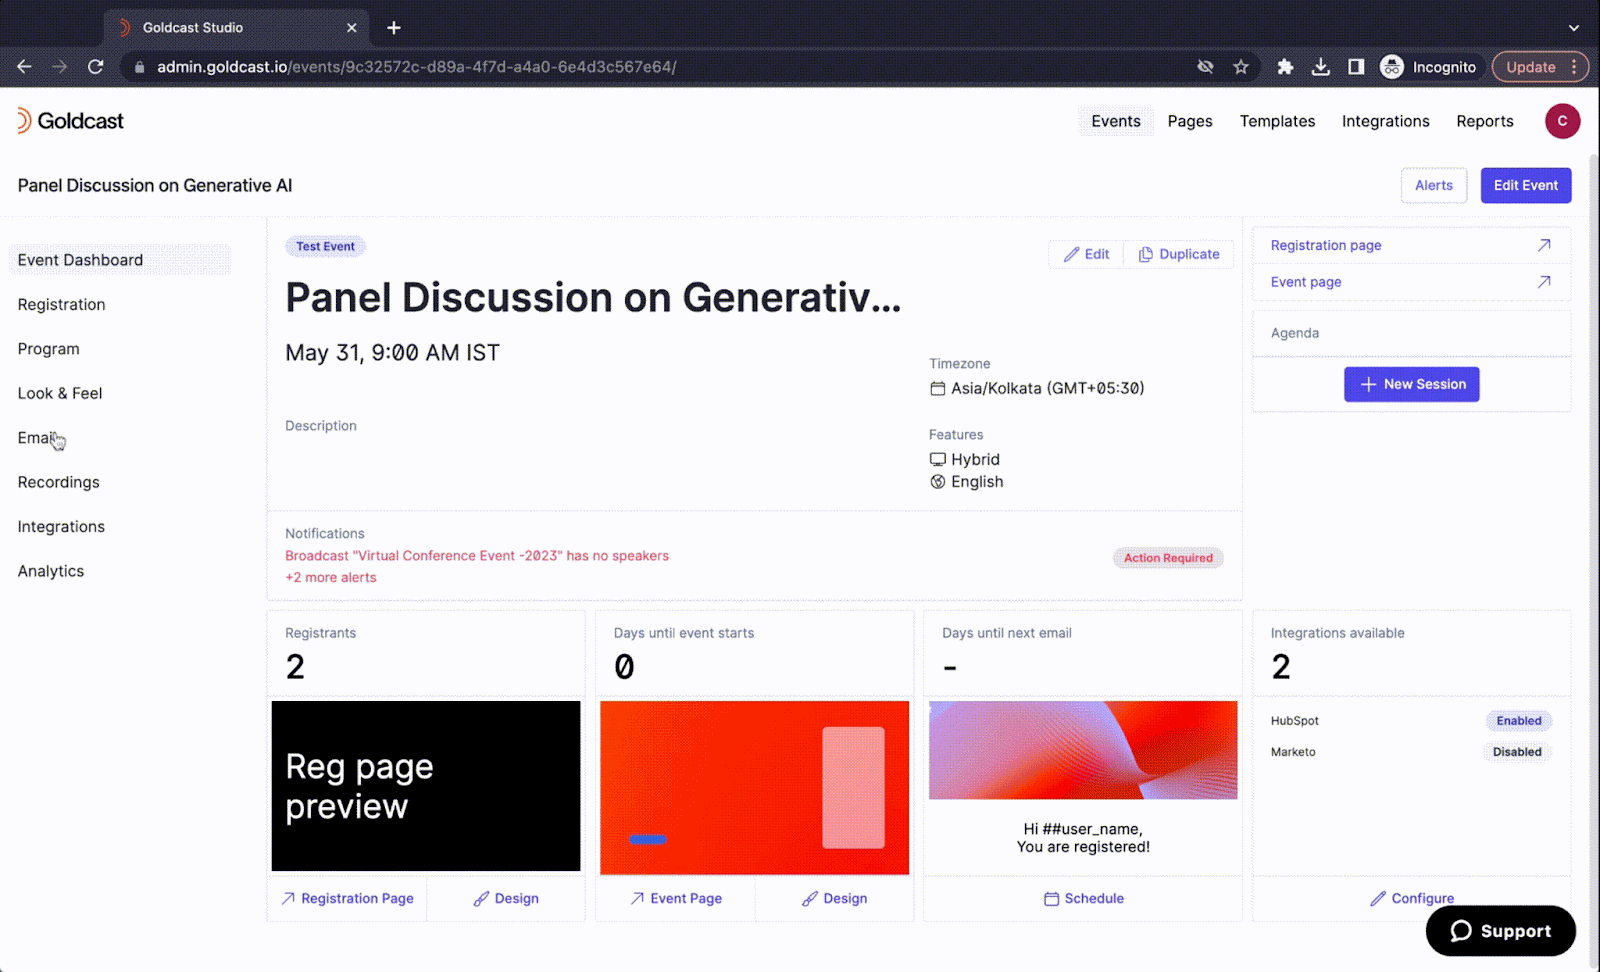
- Log in to Goldcast Studio, and from the Events list, click the event you want to edit.
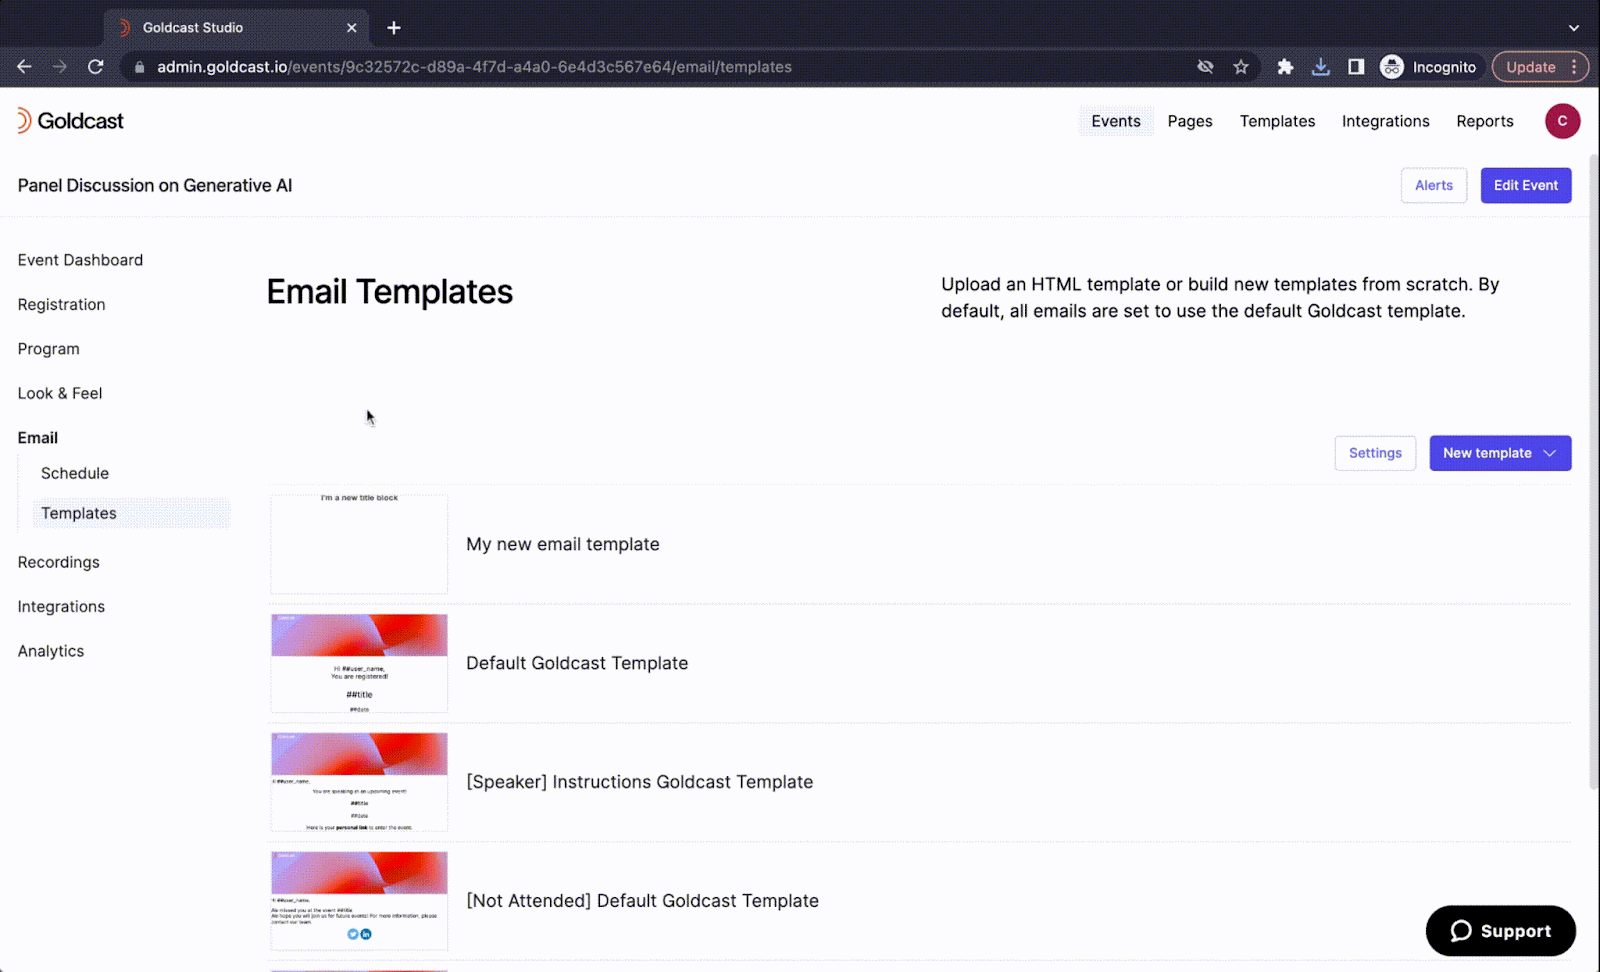
- From the event dashboard, navigate to Email → Templates using the left sidebar.
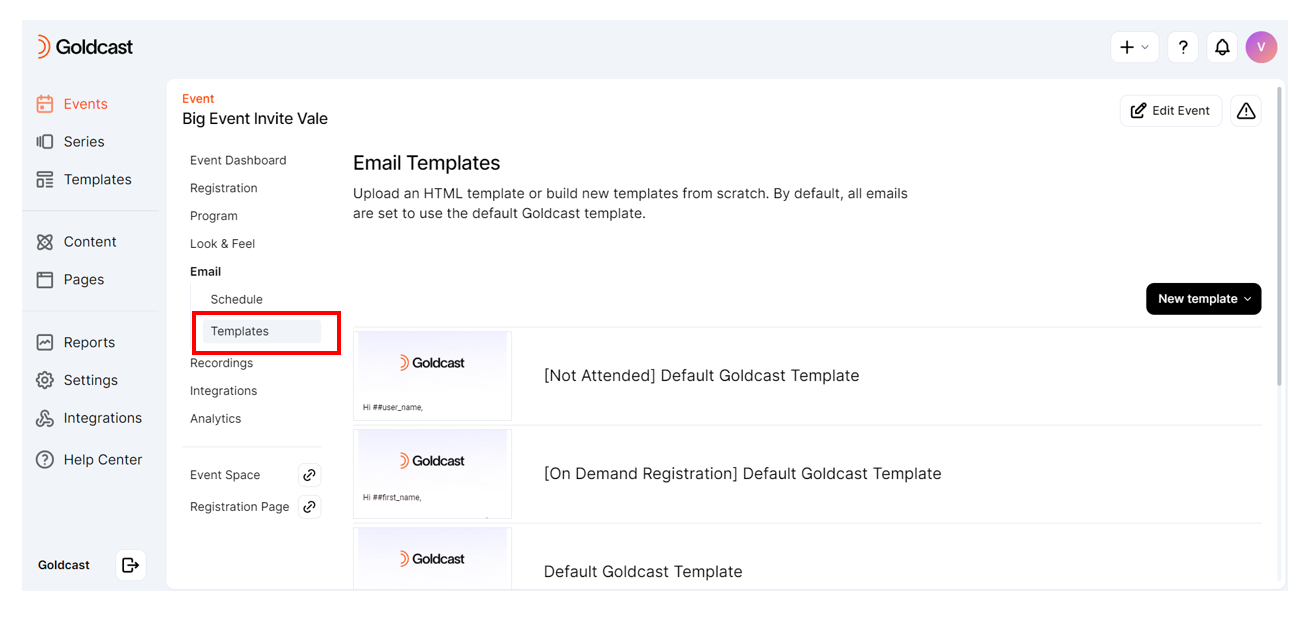
The Email Templates section displays the list of available templates for this event.
- If your event was created from Goldcast’s default event templates, the Goldcast default emails will be listed here.
- If your event was created from one of your templates, the email templates you set up there will be available.
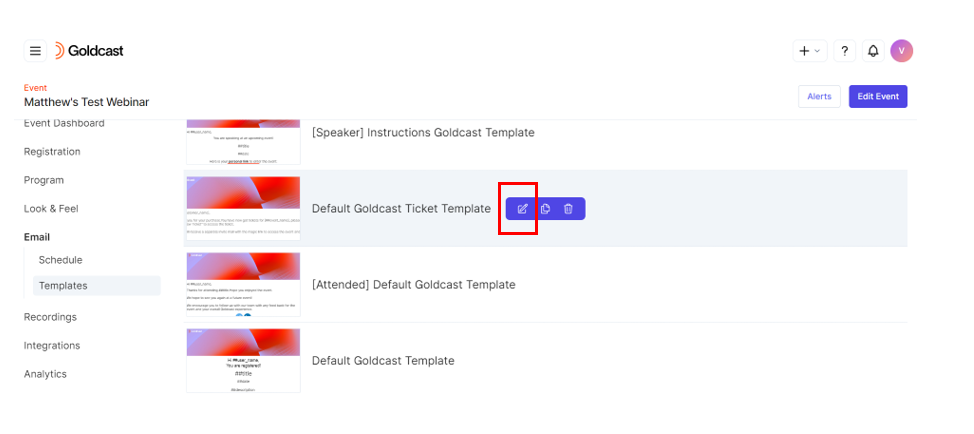
From here, you can edit, duplicate, and delete templates as required.
For Webinars
- Log in to Goldcast Studio, and from the Events list, click the webinar you want to edit.
- From the webinar dashboard, navigate to Email → Templates using the tabs on the top.

- The Email Templates section displays the list of available templates for this event.
- If your event was created from Goldcast’s default event templates, the Goldcast default emails will be listed here.
- If your event was created from one of your templates, the email templates you set up there will be available.
From here, you can edit, duplicate, and delete templates as required.
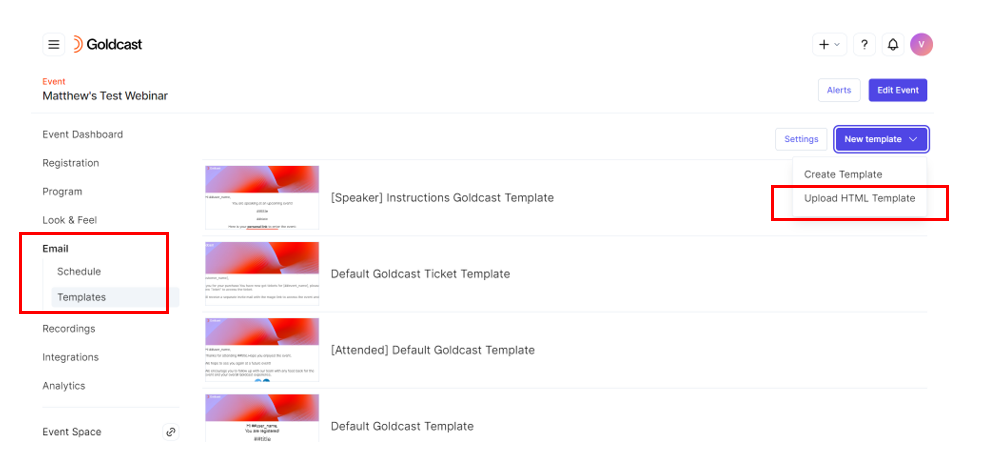
Create a new template
To create a new template, you can either upload a custom email template in an HTML file format or create one from scratch in Goldcast’s email builder.
Upload an HTML template
For Events
- Log in to Goldcast Studio, and from the Events list, click the event you want to edit.
- From the event dashboard, navigate to Email → Templates using the left sidebar.

- Click New Template and select Upload HTML Template.
- A popup will appear. Give the template a name, click the upload HTML file button, and select the file you want to upload from your computer.
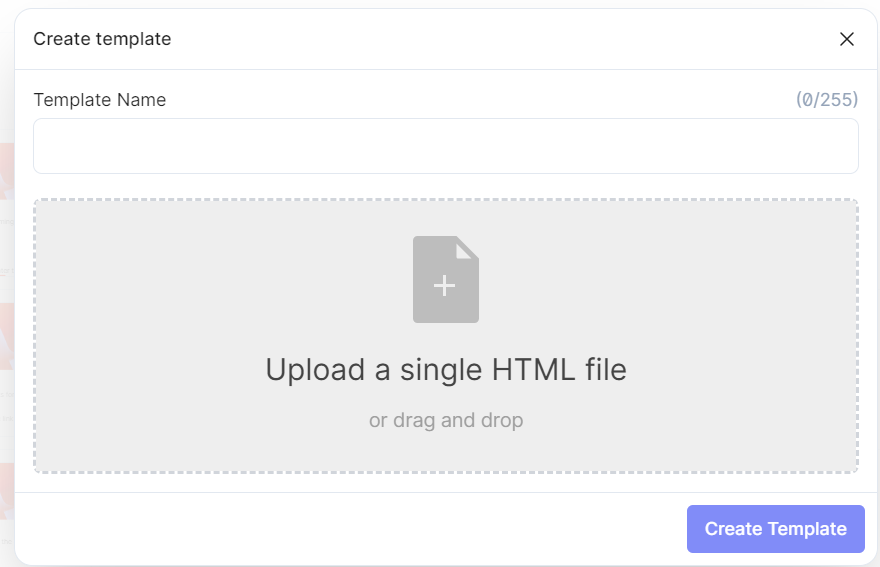
- Click Create Template.
For Webinars
Tab Body
Create a template in the email builder
For Events
- From the event dashboard, navigate to Email → Templates.
- Click New Template and select Create Template.

- This opens the Goldcast email template builder.
Why the Email Template Builder Shows a Blank Screen
The Goldcast Email Template Builder uses the Bee Email Editor. If the editor loads to a blank screen, it’s usually because requests to app-rsrc.getbee.io and loader.getbee.io are returning empty responses (commonly caused by Zscaler or other corporate security/proxy).
Please ask your Network/Security team to:
- Allow
*.getbee.io(coversapp-rsrc.getbee.io,loader.getbee.io, and related subdomains). - Bypass SSL/TLS inspection for
*.getbee.io. - Ensure WebSocket traffic (
ws://andwss://) to Bee domains is allowed/not blocked.
After changes, clear the browser cache and reload the Email Template Builder.
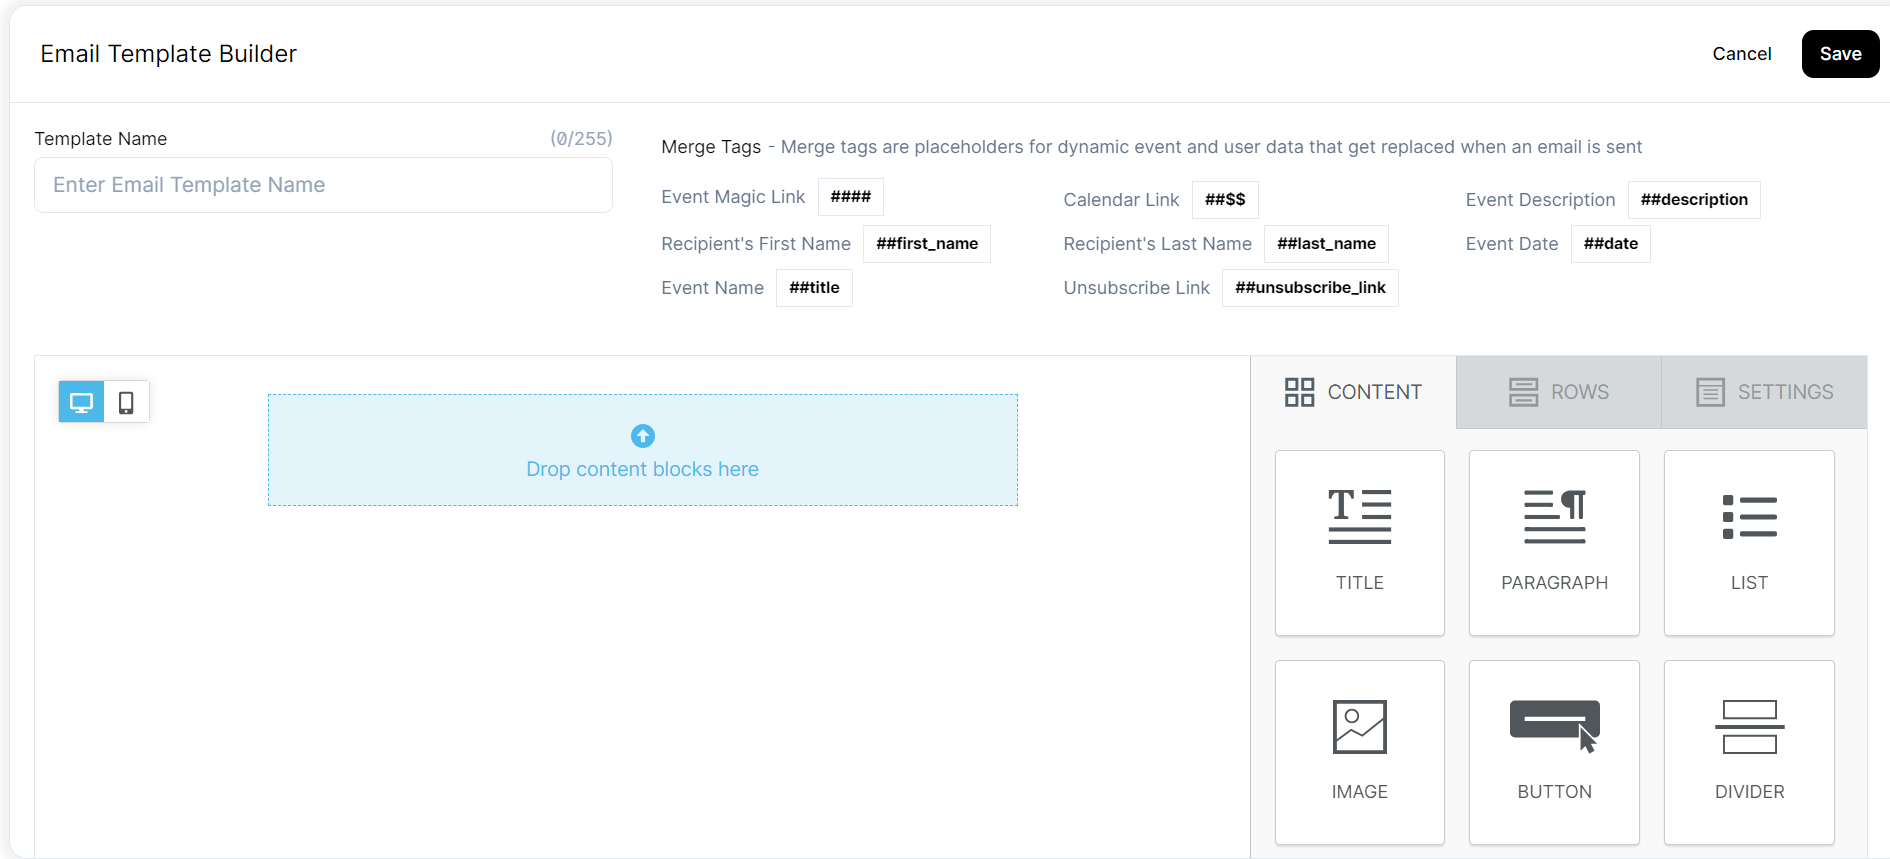
- Enter a name for your template in the Template Name field.
- Drag content blocks from the right side of the screen onto the left window.
- Once you have finished creating your template, click Save.
Pro Tip: For detailed instructions on using the email builder, see these template editor instructions.
Best practices for email template design
Pro Tip: When attendees sign up for your event, it's important they receive a registration confirmation email with their unique login link (magic link) and a button to add the event to their calendar. Don't forget to include the merge tags for the magic link and calendar link in the email.
As you are crafting your template, you can add event content automatically using the following merge tags:
| Description | Merge Tag |
|---|---|
| Login Link (Magic Link) | #### |
| Calendar Link | ##$$ |
| Registration Link | ##registration_link |
| Recipient's First Name | ##first_name |
| Recipient's Last Name | ##last_name |
| Event Title | ##title |
| Event Date | ##date |
| Event Description | ##description |
For a complete list of all merge tags, refer here.
Tips for designing email templates
- The recommended specification for the email banner is 1:3, and the preferred image types are JPEG, PNG, GIF, or AVIF.
- In your emails, you can include this information for your attendees:
- “The Goldcast platform is accessed through your web browser. For the best experience, access the platform via Chrome or Safari browsers and pause VPN and ad-blockers.”
And, if you need any extra help creating and scheduling your email templates, you can reach out to support or your CSM for further assistance.
Editing an email template
Goldcast allows you to customize email templates to align with your company’s branding and other event requirements. Here’s how you can do it:
For Events
- Log in to Goldcast Studio with your credentials, select the Events tab to get a list of all your events, and click your preferred event.
- Navigate to Email → Schedule using the left navigation menu.
- Click the email whose template you want to edit. This opens the Edit Email window.
- Click the Edit Email Template button to open the Email Template Builder window.
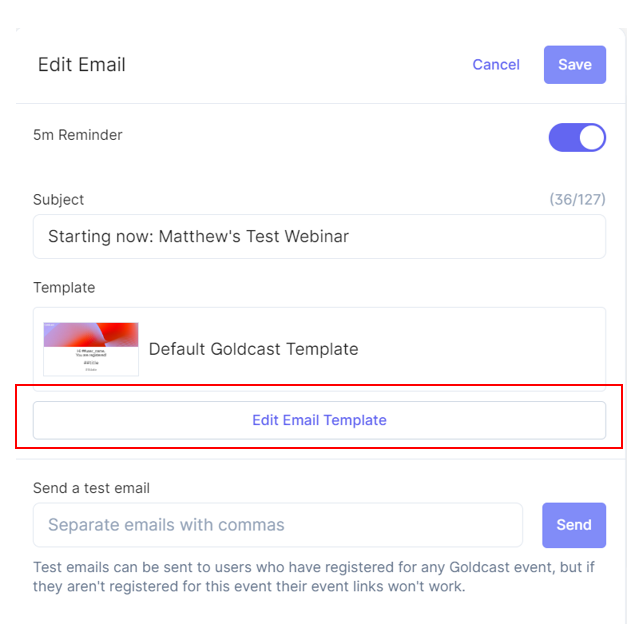
- Alternatively, you can navigate to the Email → Templates tab using the left panel, select your preferred template, and click the Edit icon to open the Email Template Builder window.
- Make the necessary changes to the template by using the drag-and-drop components on the right side.
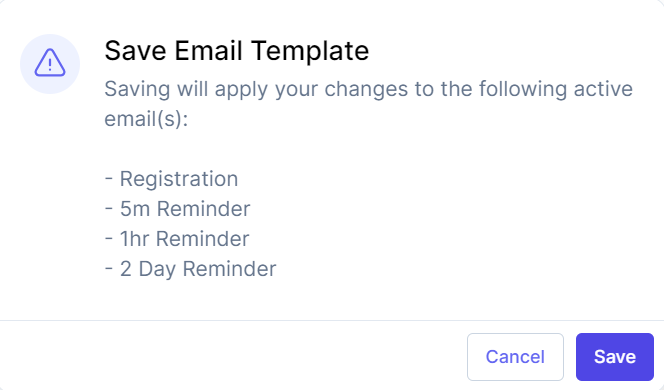
- Click Save in the top-right corner of the Email Template Builder. You will receive a pop-up alert that shows the list of emails that will be impacted by this change.
- Click Save to confirm the changes.
For Webinars
Tab Body
Heads up! If you've uploaded an HTML template, the Edit Email Template button won't be visible, as we don't support in-app editing of custom uploads. However, you can edit it outside of Goldcast and re-upload the template.
Pro Tip: If you need a specific template for an event, start by copying an existing template. Then, make the necessary changes to the duplicate and assign it to the event. This way, you avoid making changes to the original template and can create email templates that are tailored to specific events.
Scheduling emails
Updating an Existing Email Schedule
The following are the steps to update an existing email schedule:
- Log in to Goldcast Studio with your credentials.

- Go to the Events tab to get a list of all your events.
- Click the desired event you want to edit.

- Navigate to Email → Schedule using the left panel. The Email Schedule page appears. This page displays the list of active emails in chronological order.
- Click the desired email schedule.

- (If needed) Update the subject line of the email schedule.
- Select the target audience for this email from the dropdown. The available options are:
- All Registrants – Sends to everyone who registered for the event, regardless of attendance status. For example, general announcements, schedule changes, event-wide updates, and so on.
- Event Attendees – Delivers only to registrants who actually attended the event. For example, post-event surveys, thank-you notes, and so on.
- Non-Attendees – Targets registrants who did not attend the event. For example, re-engagement offers.
- Select your desired send time using the relative time picker. The time picker has the following options:
- Before the event begins – Sends emails prior to the event start time. Ideal for reminders, preparation instructions, or last-minute updates.
- After the event begins – Sends emails once the event is live. Useful for welcoming late joiners, sharing real-time resources, or redirecting to alternative sessions.
- Before the event ends – Triggers emails as the event is winding down. Great for encouraging session feedback, promoting related events, or sharing urgent announcements.
- After the event ends – Delivers emails post-event. Perfect for follow-ups, recording access, surveys, or thank-you notes.
- (Optional) Enter recipient email addresses separated by commas and click Send.
- Enable the toggle to activate the schedule email.
- Click Save. Upon clicking this button, the email gets successfully scheduled.

Creating a New Email Schedule
The following are the steps to create a new email schedule using the email template:

- Click New Email.

- Enter a clear and engaging subject line for your email.
- Choose a desired email template from the dropdown to define the email’s layout and style.
- (Optional) Enter test recipient email addresses separated by commas and click Send Test to review the email before scheduling.
- Select the intended recipients from the dropdown. The available options are:
- All Registrants – Sends to everyone who registered for the event, regardless of attendance status. For example, general announcements, schedule changes, event-wide updates, and so on.
- Event Attendees – Delivers only to registrants who actually attended the event. For example, post-event surveys, thank-you notes, and so on.
- Non-Attendees – Targets registrants who did not attend the event. For example, re-engagement offers.
- All Staff – Sends to all assigned event team members, such as organizers, moderators, and support. For example, internal briefings.
- All Speakers – Delivers only to confirmed event presenters. For example, presentation deadlines.
Note: If you want to send an email immediately, go to the Send Now tab and click Send Email.
- Use the relative time picker to schedule when the email should be sent. The time picker has the following options:
- Before the event begins – Sends emails prior to the event start time. Ideal for reminders, preparation instructions, or last-minute updates.
- After the event begins – Sends emails once the event is live. Useful for welcoming late joiners, sharing real-time resources, or redirecting to alternative sessions.
- Before the event ends – Triggers emails as the event is winding down. Great for encouraging session feedback, promoting related events, or sharing urgent announcements.
- After the event ends – Delivers emails post-event. Perfect for follow-ups, recording access, surveys, or thank-you notes.
- Click Schedule Email. Upon clicking this button, an email schedule gets successfully created.

Editing email details and assigning templates
Each email you schedule has its subject line and assigned email template. To edit these options:
For Events
- Log in to Goldcast Studio with your credentials, select the Events tab to get a list of all your events, and click the event you want to edit.
- Navigate to Email --> Schedule using the left panel.

- Click the Email you wish to edit. The Edit Email window appears.
- From the Template dropdown list, select the correct template.
- You can edit the existing email subject. (Optional)
- Turn off this email reminder from the Edit Email window by turning its toggle off.
- Click Save.
For Webinars
Tab Body
Testing an email
Before you proceed with sending out an email, we highly recommend you test the email. Follow these steps to send a test email:
For Events
- Login to Goldcast Studio using your credentials and open your preferred event.
- Navigate to Email → Schedule using the left navigation panel.

- A list of active emails is displayed. Click the email you want to test. The Edit Email window appears.
- Ensure your email details, including the subject line and selected template, are correct.
- Add the required email addresses in the Send a test email text box, separated by commas.
- Click Send.
Note: If you are conducting tests on the email features, including the magic link, it is crucial to utilize an email registered as an attendee for the event being tested. However, if you’re only verifying the look and feel of the email template, you can use any email address previously registered as an organizer (attendee or speaker) on Goldcast.
Please check your inbox for the test email and ensure the content and subject match what you had in mind.

For Webinars
Tab Body
Updating your email alias
By default, emails from the Goldcast platform will always come from no-reply@goldcast.io. If you want to send from your own domain, read this guide on Setting up a Custom Email Domain for Your Events.
However, you can change the name from where the email appears to come from inside your event. By default, the sender’s name is set to "Goldcast." You can customize it to something more personable as "Your Name from XYZ Company" or "The Team at XYZ Company," for example.
To change your email alias:
For Events
- Select your preferred event from the Events list.
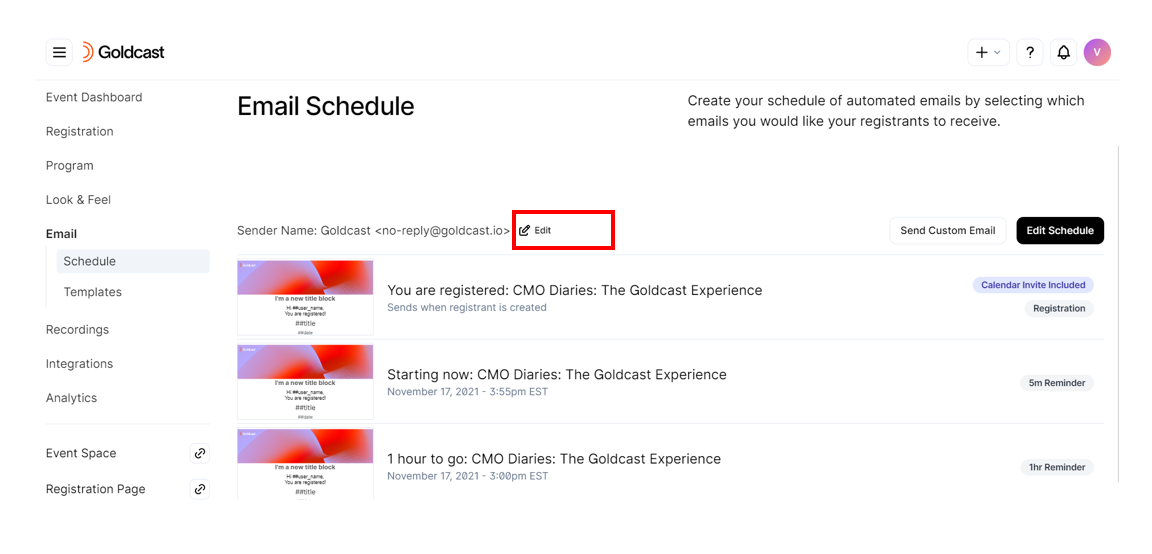
- Navigate to Email → Schedule using the left navigation panel.

- Click the Edit icon on the Email Schedule page.
- Enter the name as you’d like it to appear in the Sender Name field.
- Click Save.
For Webinars
Tab Body
Sending a custom email
In the time leading up to, during, or following your event, you may need to send an additional email to event registrants who aren't a part of the existing email schedule for your event. For example, if the event has been rescheduled or a change has been made to the agenda.
To send a custom email:
For Webinars
- Select your preferred event from the Events list.
- Navigate to Email --> Schedule. A list of active emails is displayed.

- Click Send Custom Email button. The Send Custom Email window appears.
- Click Email Registrants.
- In the Email Subject text box, add the subject line.
- From the Template dropdown list, select a template of your choice.
- Before sending an email to event registrants, it is good practice to send a test email to yourself. To send a test email, follow the below steps:
- Click Test Email.
- In the Email Subject text box, add the subject of your choice if you don’t wish to use the default one.
- From the Template dropdown list, select the template of your choice.
- In the Recipients text box, add the required email addresses, separated by a comma.
- Click Test Email.
- If the test email works correctly, return to the Email Registrants tab.
- Click Send to Registrants. This email will be sent to all users registered for this event.
Note: Custom email templates must be added to your event’s Email Templates list to appear in the templates dropdown on this page. Please review the above section of this page for instructions on how to create a new template.
FAQs
1: How do you schedule speaker and staff invites?
Refer to the step-by-step instructions on setting up the speaker invite emails and staff invite emails.
2: Can I attach files to the emails I send from Goldcast?
You can add a link to the file in the email body. However, directly attaching the file to the email is currently not possible.
For further questions, contact support (gc.support@cvent.com) or your CSM.
3: Can I modify the timing of standard reminder emails?
Yes! You can fully customize their timing using the relative time picker to suit your event schedule.
4: When should I use custom emails?
Use custom emails for unscheduled, situation-specific communications such as last-minute speaker changes, agenda updates, or urgent announcements that fall outside automated sequences.
5: How many custom emails can I send for each event or template?
You can send up to 10 custom emails per event and up to 10 custom emails per template.
6: Why does the Email Template Builder show a blank screen, and how do I fix it?
The Goldcast Email Template Builder uses the Bee Email Editor. If the editor loads to a blank screen, it’s usually because requests to app-rsrc.getbee.io and loader.getbee.io are returning empty responses (commonly caused by Zscaler or other corporate security/proxy).
Please ask your Network/Security team to:
- Allow
*.getbee.io(coversapp-rsrc.getbee.io,loader.getbee.io, and related subdomains). - Bypass SSL/TLS inspection for
*.getbee.io. - Ensure WebSocket traffic (
ws://andwss://) to Bee domains is allowed/not blocked.
After changes, clear the browser cache and reload the Email Template Builder.